
Hello Lovelies, is it Friday Already ?
Thank you all so much for your comments on my new cushion , you always make me smile :0)
So here is a quick tutorial , in case you fancied giving this stitch a try for yourself. As I mentioned in my previous post , the inspiration came from this lovely cushion by the super talented Sarah London.
To begin with you work 2 rounds of a standard granny square...I've done mine in one colour, but that's up to you,different colours would look good. They are the pink rounds in this image..........
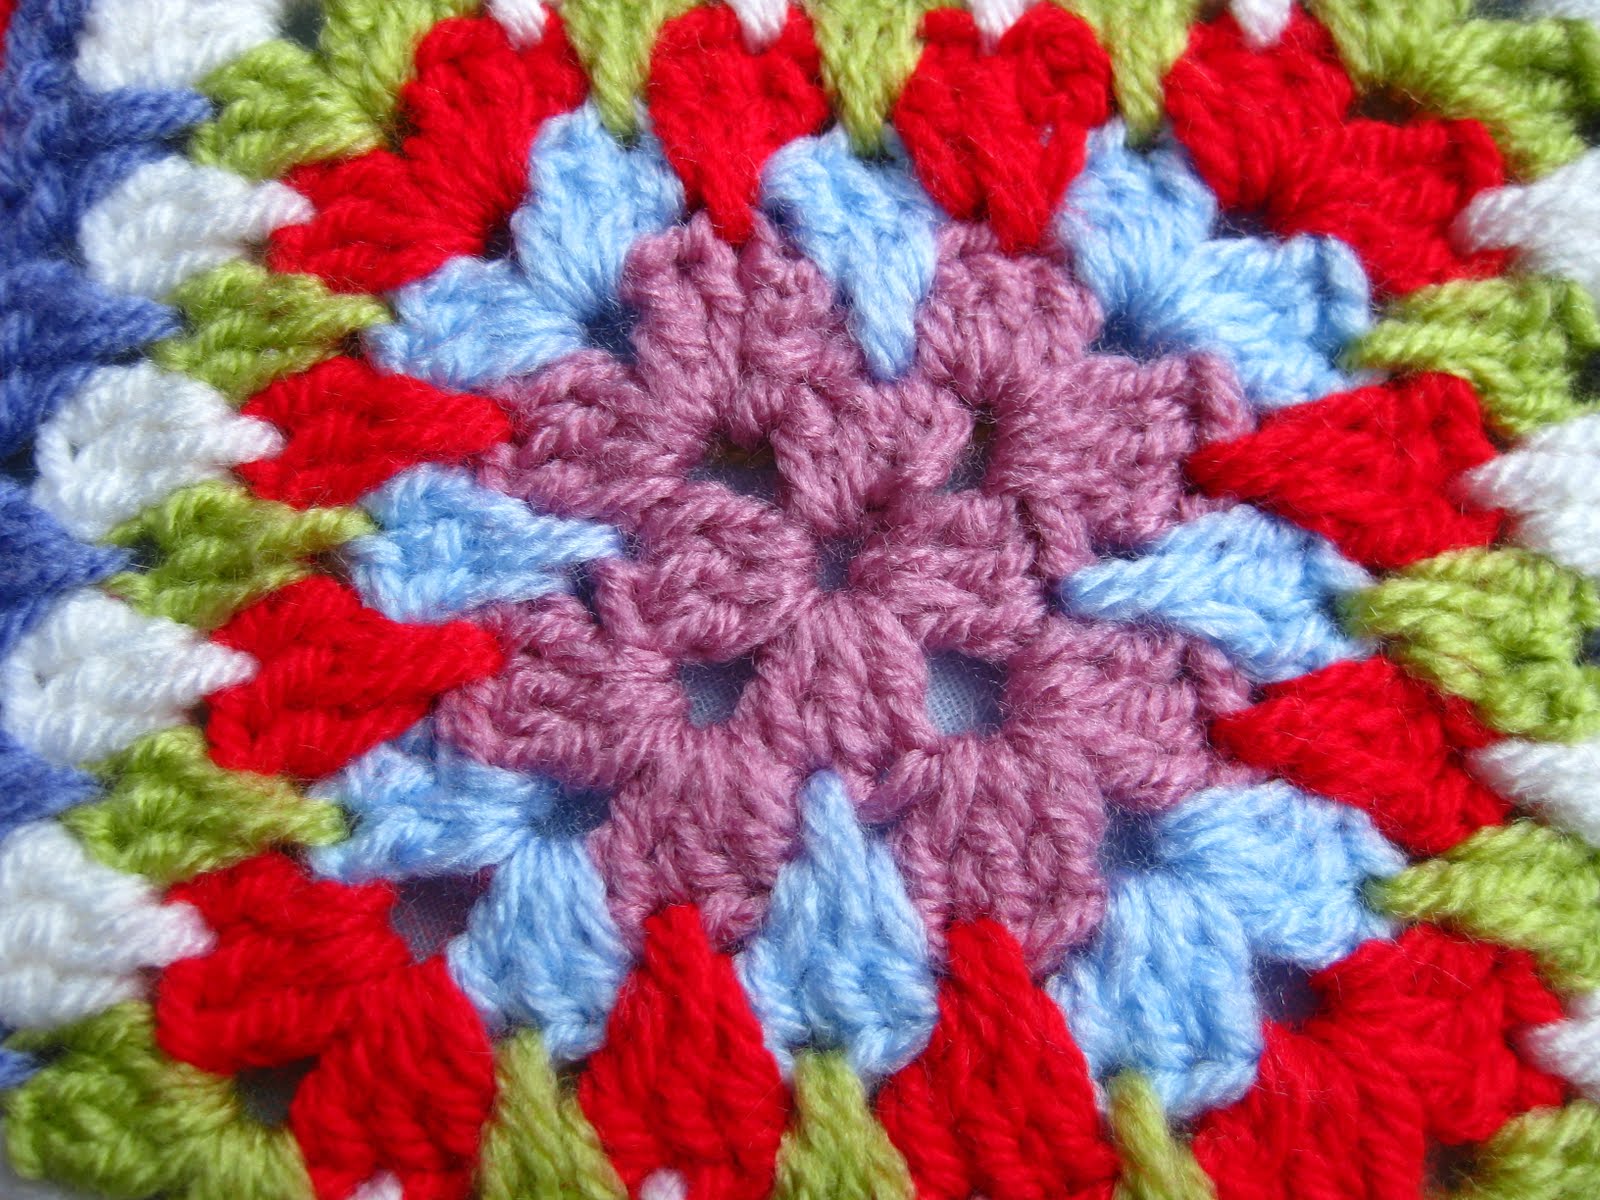
The spikes begin on the third round and are worked on the straight edges only. To make a spike cluster work your first U.S. double crochet ( U.K.treble) as usual , into the space of the previous round....

Work the second D.C. into the top of the second D.C. of the round before last . You will end up with a long D.C. stitch that bridges the space so don't work it too tightly....
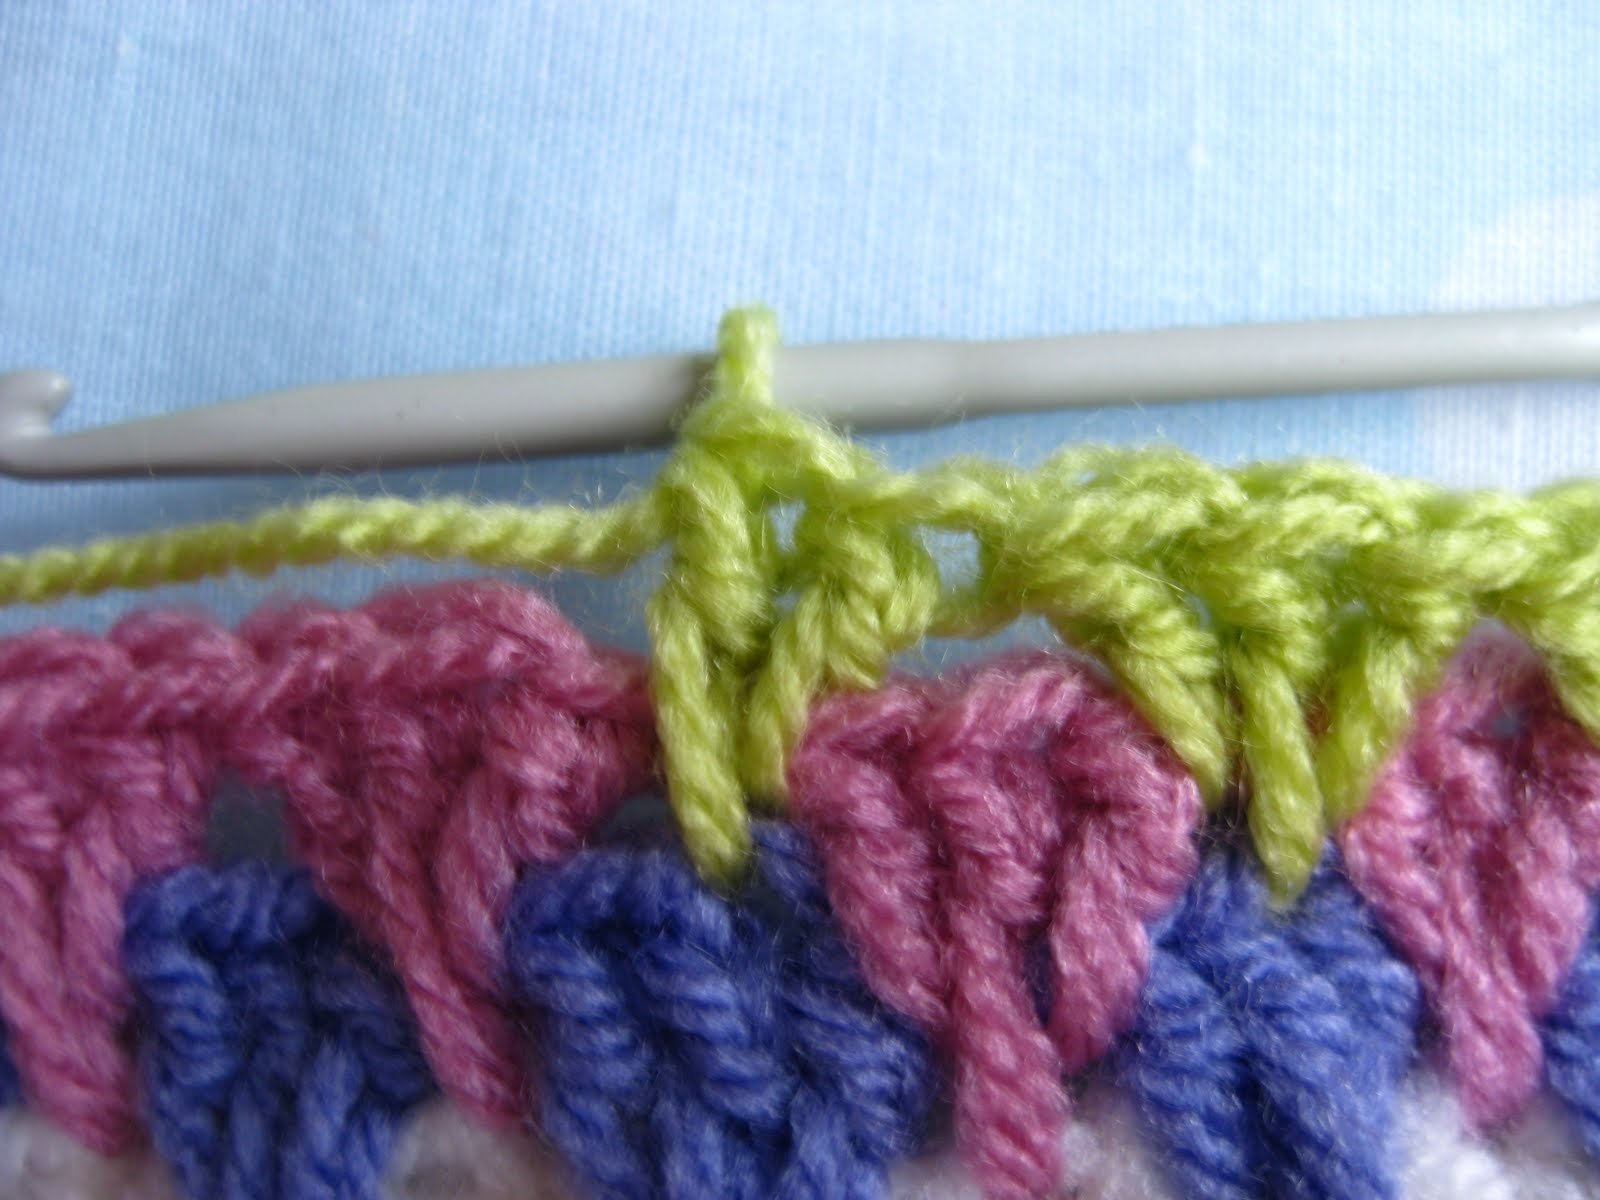
I've indicated where your hook goes with a needle in this picture....
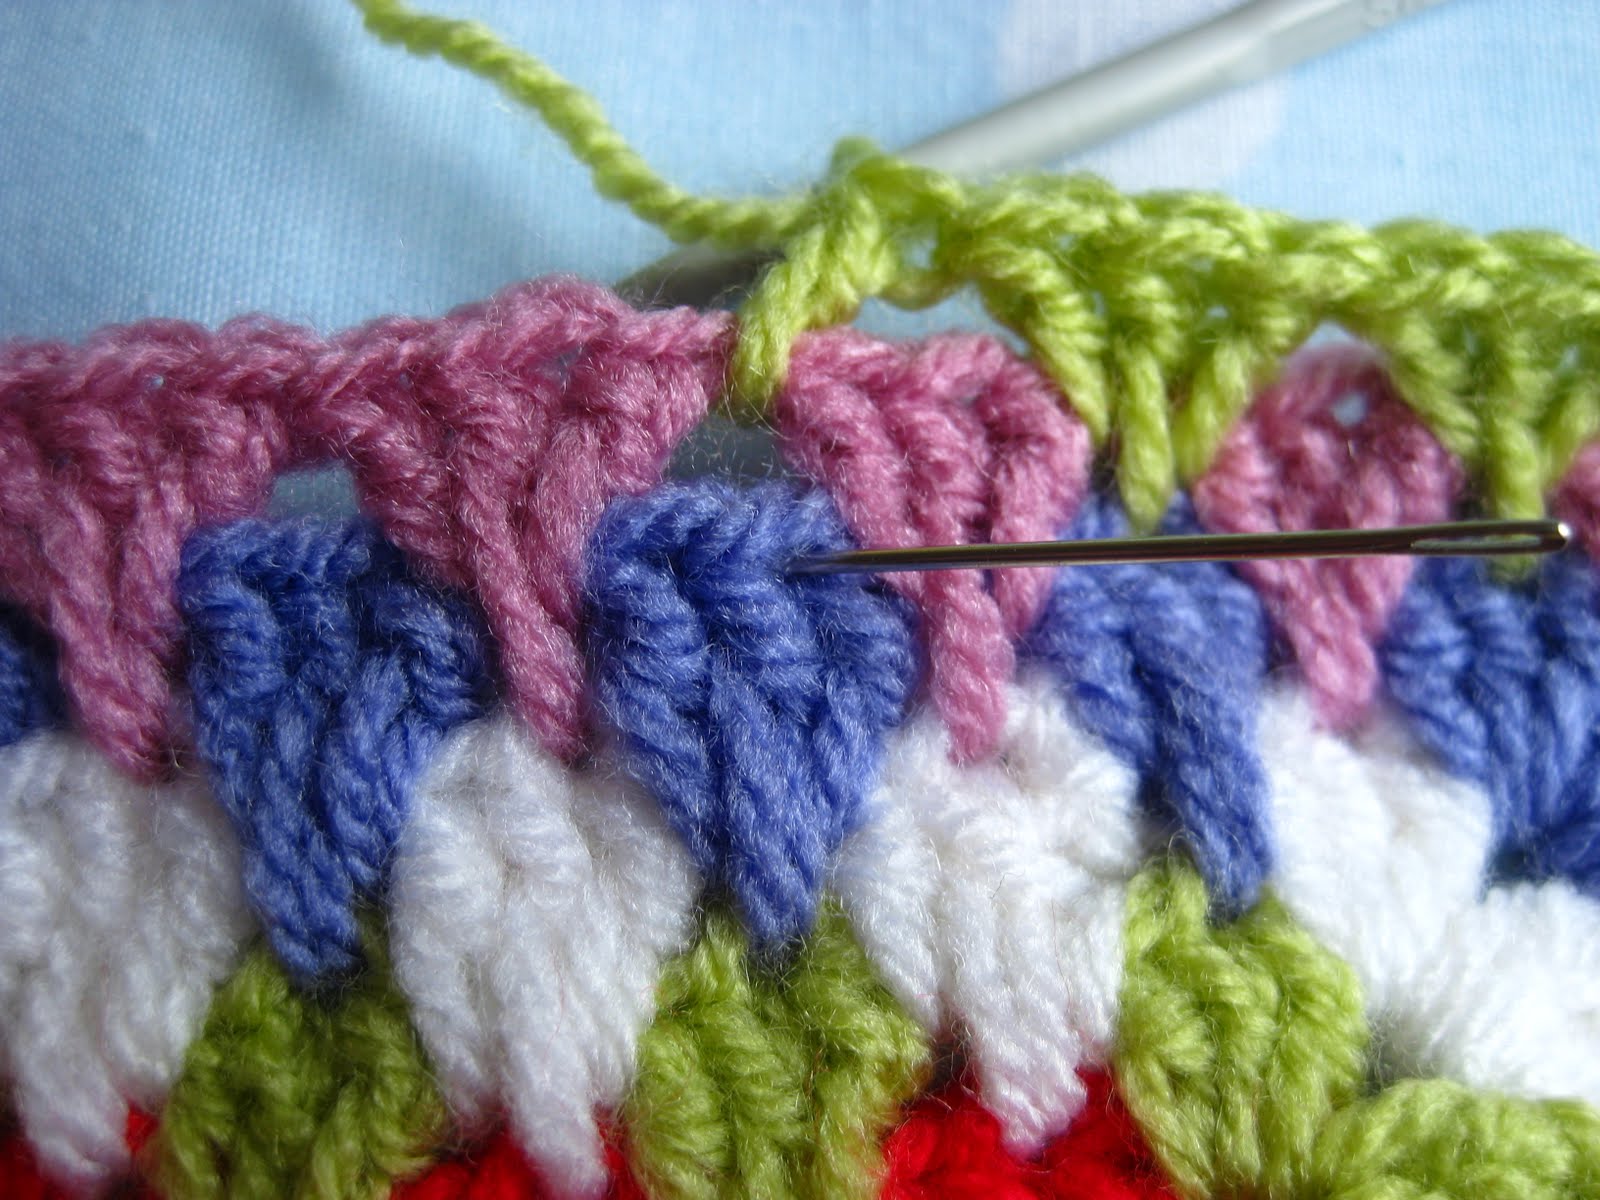
finally work the third D.C. into the space of previous round....

There , you've done it , that was easy I hope.
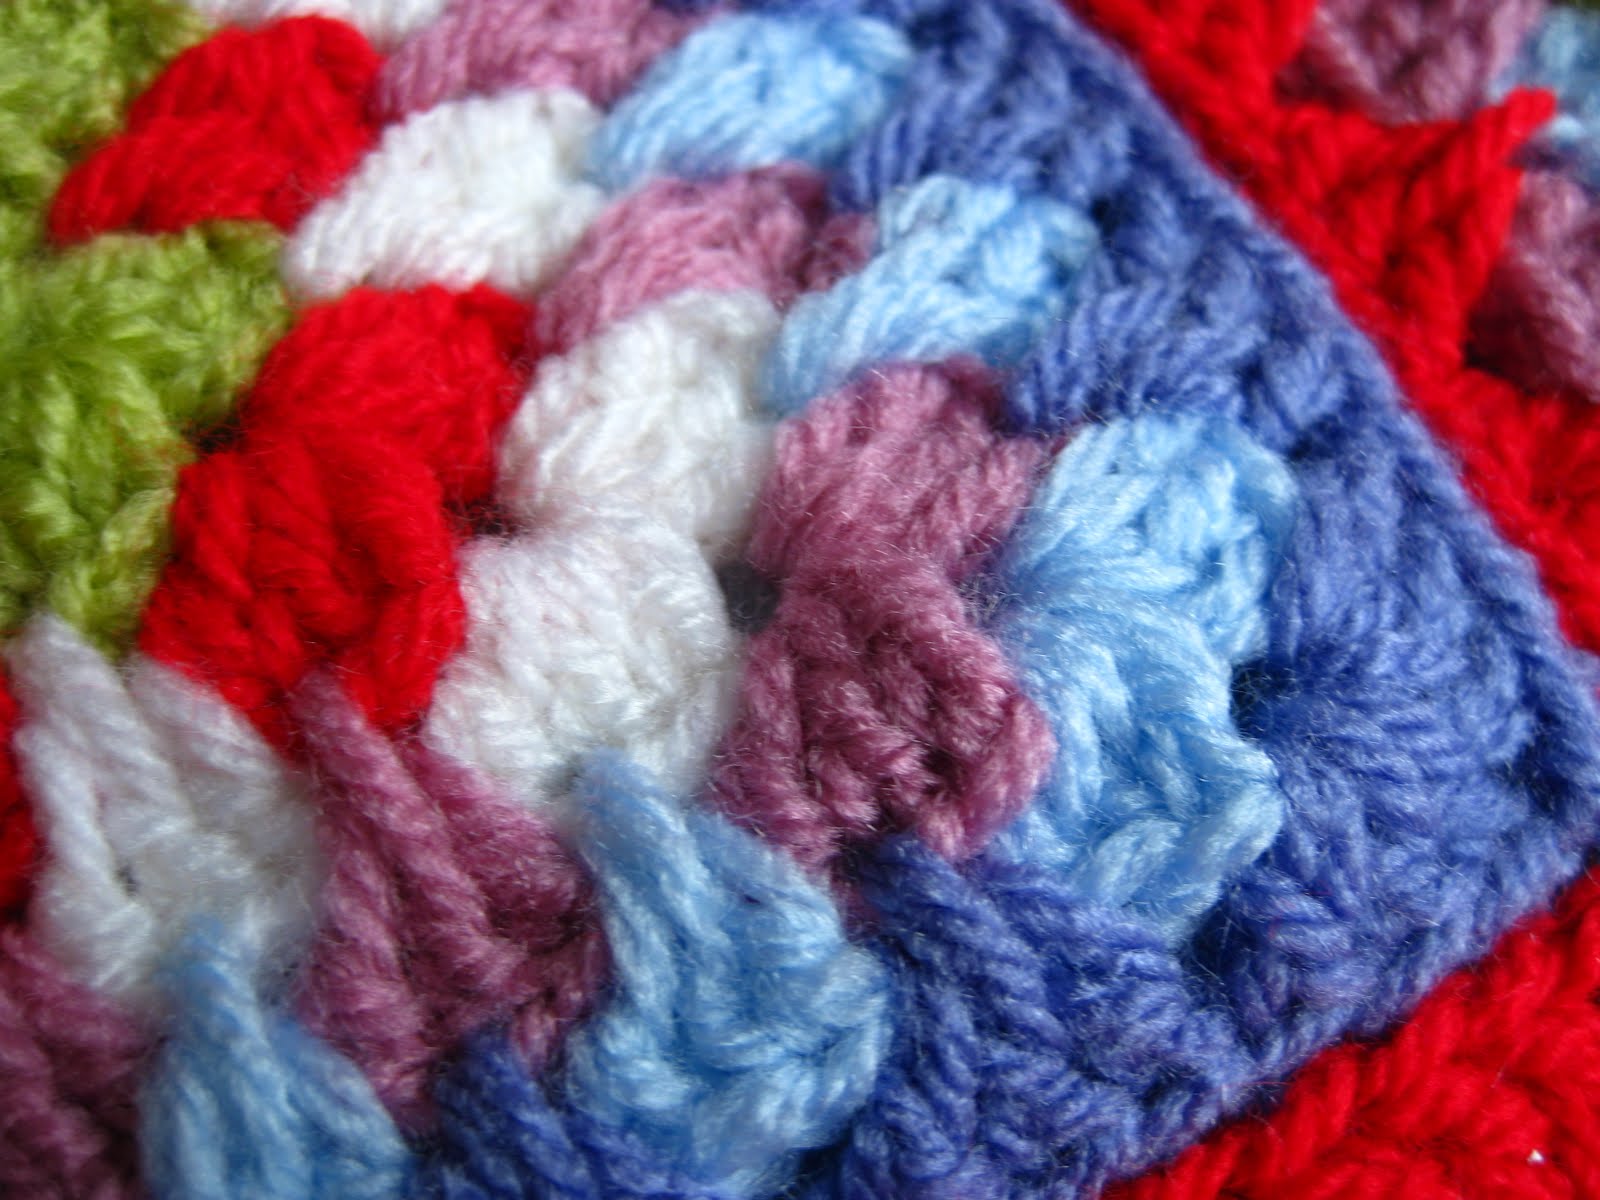
When you get to the corners you work these as normal, you know , 3 D.C. chain 2 , 3 D.C. into the corner chain space of the previous round......
Footy note
Due to the spike clusters being "tied" to the stitches of the round before last I had an issue with the square becoming miss - shaped and the corners protruding, does this make sense ?
I think the best way to combat would be to work some , or all, corner clusters in Half Double crochet ( Half Treble Crochet - U.K. ) so they are not as tall.
I would recommend you experiment with this a bit to see what works best for you .
At this point I would like to credit the artist of the painting that appeared in this image....

A few of you mentioned it in your comments so I thought you might like to know it's an original, one off, painted my a very talented local Artist....my Mum :0)
Here's a closer view....

My home is full of her lovely paintings ...I'll do a post dedicated to them one day.
Have a great weekend , happy hooking :0)
Jacquie x
That's an awesome idea - must put it into the 'will try' pile (this pile is getting awfully big!!).
ReplyDeleteThank you so very much for sharing this with us all!
ReplyDeleteJust love it!!
ReplyDeleteYou make it look so easy ;-)) Gorgeous painting. Have a lovely weekend, Dee x
ReplyDeleteI'm really loving your work! You're so clever and I love the colours you use! Thanks for the toot! xxx
ReplyDeletethanks so much for the tutorial. your mum sounds a very talented and interesting lady look forward to your post dedicated to her. luv Jan
ReplyDeleteHey Jacquie, what a talented family you have.
ReplyDeleteLove to see more of your mums work.
Have my crochet hook here ready to go, shall give it a whirl........
Have a great weekend,
Claire :)
Thanks for the tute! Lovely painting. x
ReplyDeleteThanks for the 'show and tell' :0) I might have to try this at the weekend. Love the colours that you have used xx
ReplyDeleteGreat crochet and what a fabulous painting! Do show us more. xxx
ReplyDeleteWhat an excellent twist on the traditional granny stitch, will most definatly be trying it out, thankyou for the brilliant tutorial. Pixie
ReplyDeleteHi Jacquie,
ReplyDeleteMay I say your cushions look beautiful on your sofa. What a splash of colour. Talking of colour, your Mothers paintings are really lovely. Would look forward to a post on her work too!
Hugs and have a good weekend, Suex
look forward to seeing more of your mums paintings, I like the way she uses colour. Wishing I could crochet, yours looks so homely.
ReplyDeleteooh I definitely think I could manage that. Thanks for the tutorial!
ReplyDeleteYour mum has a talent, the painting is lovely xx
Fantastic tutorial Jacquie, it is another gorgeous make, I haven't been around so I missed the Ta-Dah :( love the colours xxx
ReplyDeleteI have fallen in love with the colors splashed around . Beautiful and truely inspiring work. I have just started to share my work and can be visited on my link http://thisorthat-homecraftandprojects.blogspot.com/ . Would love to have ur views on my work.
ReplyDeleteOooh, I wish I'd known about this before I started my latest granny square blanket! It's firmly placed in the "definitely next time" category!
ReplyDeleteLove your mom's work! And so perfectly placed! :D
I can't tell you how badly my fingers are itching to make a spiked granny square since seeing yours, sooo lovely.
ReplyDeleteWell, like someone said earlier this will go in the to do list. And yes getting very long.
ReplyDeleteDeborah In Texas
Hi there--I couldn't find an email address for you so I'm commenting here.
ReplyDeleteI just wanted to let you know I've awarded you the "Stylish Blogger Award." I gave it to blogs whose posts I look forward to reading, and that give me the warm fuzzies. You can stop by my blog and pick it up (http://sweetbeebuzzings.blogspot.com/2011/01/stylin.html), view it, leave it, throw it against the wall, whatever. It's yours to do with as you please or to leave alone. Just wanted to let you know I appreciate what you do :)
Will be sharing a link to your Granny Spike Stitch tomorrow at Tangled Happy as well. Love all you colorful creations! Thanks for sharing. :)
ReplyDeleteJust found your blog through Tangled Happy - I love your crochet style; it's similar to mine in that it's quite fresh and not too fussy. Very glad to have found your blog!
ReplyDeleteI like this. I'm thinking of making a granny scarf for a friend, I may use this pattern/idea of yours to give it a bit of a different look.
ReplyDeleteLove It! I need to do a blanket with that someday! seems less holey than just a plain granny stitch.
ReplyDeleteBeautiful crochet work! I found your blog via Ravelry and just became a follower. I love the colors here and I've always wanted to try a spike stitch. Thanks so much for the tutorial. Hugs, Sandy
ReplyDeleteJust found your spike stitch. I am currently doing granny square seat cushions. And the spacey holes were not making me happy about the project. But this is just what I needed. Thank you!
ReplyDeleteLovely job!
ReplyDeleteHappy Easter!
Hugs
Hi Jacquie, I just found your blog and think it's lovely and so inspiring. Few weeks ago I started crochet and have just finised my first granny square cushion. The spike stitch will be used in the next projects. Thanks for this great tutorial. I wish I'd find such lovely yarn colors as yours here in Germany...
ReplyDeleteMuchas gracias por compartir tanto, desde ahora soy una nueva seguidora de tu blog, un beso desde Argentina ♥
ReplyDeleteThank you for this wonderful tutorial. Not only was it clear and concise but your explanation on how you secure the ends answered many questions for a novice square creator!
ReplyDeleteThis is such a great way to make granny squares! Do you happen to have a reference for a simple striped afghan using the spike stitch at regular intervals?
ReplyDeletePS, I forgot to say I'm a bunny mummy too!
ReplyDeleteI will definitely be adding a few spike squares to my current granny project. First one ever. Your photos and directions are great. thank you for sharing.
ReplyDeleteThis is a gorgeous pillow and I really like the granny spike stitch. I would love if you would link this up to my new fiber arts link party! http://www.mymerrymessylife.com/2012/06/new-link-party-hookin-on-hump-day-1.html
ReplyDeleteI am thoroughly enjoying your blog posts. Thank you for all the time and care you have taken to give us lots of tips and tutorials. I would love if you had a chance to follow my blog as well http://institches-shelivsbythesea.blogspot.com/. I don't post anything as wonderful as this, but it would be nice to see you around there! Again, thank you so much for the wonderful posts. :D
ReplyDeleteBrilliant idea! Love the green cushion. So wherever do you find such a perfect "cheater"cushion? And how do you attach it? With crocheting or with needle and embroidery (thicker) thread? So beautiful! Thanks for sharing
ReplyDelete<3
I really like the spiked granny stitch, I will definitely be trying that out on a cushion, and possibly a scarf too. I like that the spike covers up the hole a bit :) Thanks for your excellent tutorial :) Claire x
ReplyDeleteAnother solution could be to make the centre stitch of the cluster a triple crochet stitch, instead of a double crochet. The TC is longer thus fixing the tension on the work.
ReplyDeleteTo work a cluster: 1DC in the space, 1TC in the row below, 1DC in the space again. Here's a link to a how-to-video with written explanation as well: http://www.lionbrand.com/faq/116.html
Hope this helps. :D
Just making a comment on your mother painting it is lovely and a beautiful use of colors and i would be proud to hang something that nice in my home maybe she should sell prints of her paintings. They WOULD SELL!!!!
ReplyDeleteI work all my corners in hdc's.
ReplyDelete